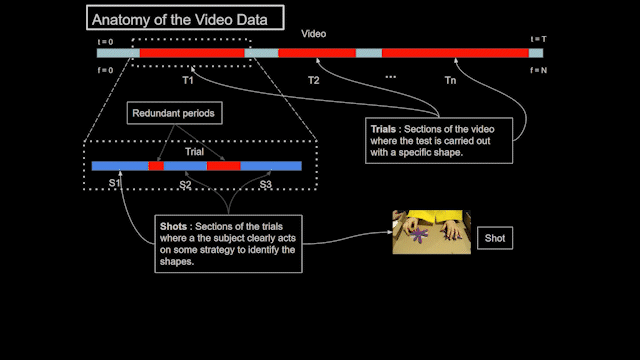
The data consists of video frames where the subjects (children) are recorded trying to touch and feel different
solid shapes, using hand gestures. The task is to identify the start and end frames of a single attempt by the
subject (shot). The activity may be repeated several times for identifying a single shape (trial), using different
strategies each time. The following schematic helps to understand our usage of the terms "shot" and "trial".
    import cv2
    from imu.video.Basic_Shot_Detection import Shot_detect
Import libraries as:
    path = '/path/to/frame/directory/'
    S = Shot_detect(path)
    S.set_thresholds([12,130,30,22,220,120],[13,60,100,20,140,240]) #The numbers are thresholds for rough hand and
    shadow segmentation
    S.set_crop_indices()
    S.extract_features()
    S.detect_shots(0.15,0.6, showPlot=False) #setting showPlot as True displays a plot for features detected and
    the shot separations made
Video Tutorial for using the tool
We have presented a video tutorial for easier understanding of the usage of the tool.
Classwise Annotation Tool
We have developed a Google Colab based shot annotation tool for the task of hand gesture annotations. While the
application is highly specific to the UMB Hand Videos, the tool and the data setup can be easily modified for use
in other kinds of video data. The tool can be found here.
Setting up the tool
The tool primarily operates in a Google Drive environment, which uses a linux based file manager. The video shot
data in a separated format, along with the initial labels is available in the "/label" directory which should be
added to your Google Drive as a shortcut as "/content/drive/MyDrive/label" . In order to obtain the "/label"
directory for the data, please contact the authors as this data can only be shared upon request.
Working with the tool
We have provided an extensive video tutorial in the following section. Libraries and Preliminaries section
needs to be run as it is with the "dev mode" checkbox is unchecked. The annotation tool identifies the annotators
and their work using their specific usernames, so it is recommended that the same username be used in both code
blocks of the Settings section.
Finally, in the Review section, choose the hand side and class to annotate. This shows the shots that have
been initially labelled as a certain class (as chosen by the user), but requires a review to assess the quality of
annotation. The review section uses a command user interface to operate. The commands, their utilities and some
use cases have been discussed in the following list.
The Start and Stop Commands(st and stp): Upon running the Command Line for Review
a text box appears as shown in the figure. In order to start the reviewing procedure, enter
command st and immediately a prompt appears before the next command line, as shown in the
next figure. The prompt "(5/27)>>>" in the figure below indicates the shot number the pointer
is at currently. For example if you wish to start at a specific shot number that you remember,
you may use that start command as: st 32 assuming you wish to start at the shot number 32
(Here, 32 is the argument to the command st). In order to stop reviewing, simply use the
command stp (no arguments) and press Enter.
The Move Pointer Command(mov): The mov command can be used to move the pointer by
one shot. This command may or may not have any arguments depending on how you wish to
use it. This is useful if you have finished working on one shot and with to work on the next
shot. Simply write mov in the command line and press Enter and the prompt increments by 1
place. If you wish to increment the pointer place by more than one places, say 5 places, you can
do this by simply adding an argument to the command as: mov 5. In order to move to the
previous shot again, use the command mov -1.
The Show GIF Command and Changing GIF frame-rate (show and fps): Unlike the
previous tool, the review tool does not display the GIFs by default. GIFs can now be viewed by
entering the command show (no arguments) in the command line and pressing Enter. The
default frame rate of the GIFs is 5 frames per second (fps). In case you need to slow the GIFs
down and view them, you can do this by using the command: fps 2. This command will set the
fps of the GIFs to 2 frames per second. Now if you re-input the command show, you can view
the slowed down GIF. The argument of the fps command can be set according to you
requirement.
The Edit Score and Edit Label Commands (ed_score and ed_label): In order to edit the
previously assigned Confidence score that has been displayed by the show command, you can
edit the score using the command: ed_score 2 (if you wish to change the score to 2. Arguments
can only be in the range: [1,2,3] i.e. the 3-point scale of the confidence scores). In order to
change the assigned label of the shot, you can do it very similarly using the command: ed_label
4 (if you wish to change the label to class 4. Arguments can only be in the range: [1,2,3,4,5,6,7]
i.e. the classes in the dataset). Please note that both these commands autosaves the scores and
labels, but should you wish to manually save them, you may do so by simply using the
command: save (no arguments).
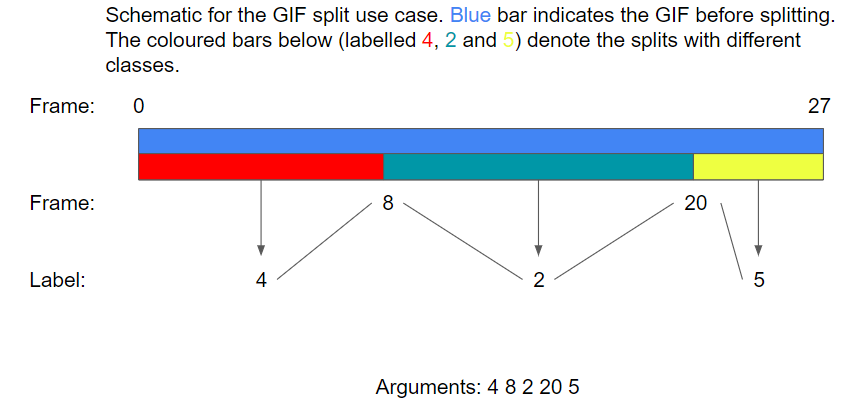
The Split and Label Command (split_label): In order to split a GIF into two or more parts and
specify a label for each part, you can use the split_label command. We describe the usage of
this command using the following use case, since the order of the arguments for this command
can be a little confusing. This is the only command in our tool that can accommodate multiple
arguments separated by a single space. Let us assume a GIF has 27 frames with the frames
numbered as [1,2,3…26,27], and we wish to split the frames into 3 parts: [1-8], [9-20] and [21-
27]. We therefore, can identify 2 split-points when such a split is made, which are at frame 8
and frame 20. Now, let the labels for the parts be assigned as: Class 4 for [1-8], Class 2 for [9-
20] and Class 5 for [21-27]. Therefore, the order in which the command arguments are placed
is: 'label - splitpoint - label - splitpoint - ...' so on, for as many splits required. Specifically
for our use case, the command can be called as: split_label 4 8 2 20 5. This command too has
an autosave feature as soon as you call the command. In order to view the GIF in the split
format, use the command: split_show and press Enter. Please note that split_show has no
arguments and it can only be used if a certain GIF has been split before.
Video Tutorial for using the tool
Here is a video demonstration of the tool in use. (Sorry for the occasional interruptions, although in a way, it
does demonstrate the various use cases).